

How To Touch Up Model In Photoshop
Does the idea of learning Photoshop overwhelm you lot? Get-go hither with The Outset v Things to Learn in Photoshop to Touch up Your Images!
The Adobe Photoshop application is a beast of a matter. There are brushes, layers, masks, filters and most 13,252 different things you can practice to your images with it. Information technology tin experience really intimidating at first considering there are simply then many buttons and options. Where should yous even outset trying to learn it? What are the first things to larn in photoshop to better your images every bit a photographer?
We're here to help. Today, we'll talk about five skills photographers tin learn in Photoshop to touch up or prepare their last edits. I'll encompass what those five skills are, how they are helpful to your editing and how to apply them. I'll also link to some more comprehensive tutorials and video tutorials then yous can learn it in more than than one style!
Nosotros will offset with two basic skills, creating a indistinguishable layer and undoing a change and then beginning with bones skills you'll want for editing photos. Once you've mastered those v skills, you're set up to movement on to another set of skills in this powerful editing programme. But first, baby steps!

In-photographic camera vs. Post Production
As photographers, our goal should ever be to get our paradigm as close to perfect in camera as possible. But allow'south exist honest…sometimes that doesn't happen. Our clients might accept skin blemishes we tin can't control. Or we miss some lint on a shirt or a phone pole coming out of someone's caput or there are people walking through the background of your prototype.
When you're shooting on location, try to fix every bit many of these bug as y'all can. It is then much faster and easier to have two steps to the correct to remove an ugly trash can from your scene or set tilt your photographic camera and fix the horizon.
Simply for those things yous missed or couldn't right in the moment, in that location's Photoshop.
Photoshop nuts for photographers
Photoshop is a seriously amazing app. I've been working in it for years and I still don't understand it's full capabilities. It can do a ton of stuff, from the uncomplicated to the crazily complicated.
This tutorial is for photographers only starting on their Photoshop journey who want to accept some basic skills to impact up a photo, i.e. fix a zit, remove a fleck of the groundwork or get rid of a bit of trash in the foreground of your scene.
The first five things to learn in Photoshop focus on touching upwards your images, not editing them into something else entirely.
Not certain how Photoshop compares to Lightroom? Check out our tutorial here!
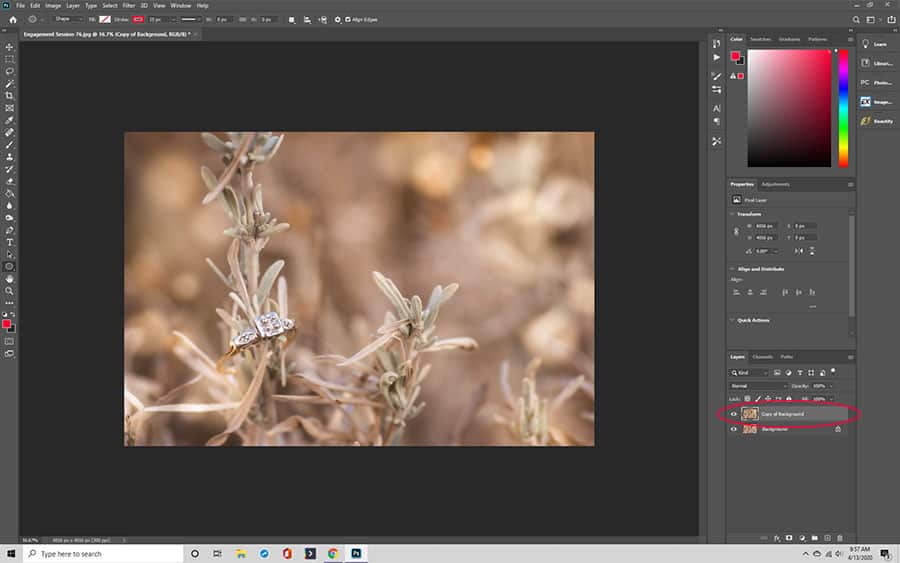
The first of the first things to larn in Photoshop – Making a duplicate layer
One of the fundamental concepts of Photoshop to sympathise is the use of layers. I like to retrieve of layers like a stack of glass sheets stacked on summit of my original image. I tin can make changes on each sheet of drinking glass that will affect how my original image looks, just it doesn't injure the original paradigm. Layers are what allows for non-destructive editing, meaning the original epitome isn't changed.
Just about every Photoshop tutorial you'll read first asks y'all to make a duplicate layer of the groundwork. Why? So if you mess upwards, y'all oasis't accidentally ruined your original prototype! Making a indistinguishable layer is a great addiction to get into someday you lot beginning to work in Photoshop.
How to do it
At that place are lots of different ways to achieve the aforementioned task in Photoshop. Tasks can be accomplished via a keyboard shortcut, a toolbar short cut and through the top menu organization.
- My favorite manner to brand a duplicate layer is to apply a keyboard shortcut. Choose Control+J on a PC or Command+J on a Mac.
- Y'all can also make one via the summit menu by choosing Layer>Duplicate Layer. Proper noun the duplicate layer whatsoever you'd like. Naming layers helps you remember what is on each layer.
- 1 concluding way to make a background layer is to cull the original image in the layers panel, right-click on it and choose "Duplicate layer."
Now you lot have a duplicate layer of your original image gear up and waiting for you lot to make changes on, without ever hurting your original paradigm! Arrive the habit of making a duplicate layer of your original image each time you lot start a new program. I promise quondam down the route you'll be grateful this was one the top skill on things to learn in Photoshop.
#2 or 5 Things to Learn in Photoshop – Undoing a change
The next skill I employ the most in Photoshop is the undo function! Undo lets you get a footstep backward and undo the change y'all just made. It'due south helpful if you lot don't similar the change y'all've practical or if you accidentally made a change you lot don't want.
How to exercise it
- Use the keyboard shortcut Command+Z on PC or Command+Z on Mac.
- Disengage your actions using the acme carte. Cull Edit>Undo.
Your change is at present gone! If you lot undo a second or third time, you'll continue to undo the deportment you've done. If you undo to far back and remove a change y'all like, yous tin can also reapply information technology using Shift+Control+ Z on PC or Shift+Command+Z. You can besides disengage your undo past choosing Edit>Redo via the height card.
Take your images from great to WOW with our simple and gorgeous Uptown Photoshop Deportment!
#iii – The Spot Healing Brush/Healing Castor
The spot healing brush tool lets you set up imperfections in your epitome. It'southward great for fixing dust specs or smudges left backside on your physical equipment (dust on your lens, dust on your sensor, a lens smudge, etc.). It also helps fix a blotch on your subject area'due south peel, erase flyaway hairs or remove lint or dandruff from wearable.
When yous're using the spot healing brush, Photoshop automatically samples a small expanse of the image from right around where you are using the brush. Then information technology applies that sample over the top of the are yous are trying to fix. It'due south a great, quick fix for small blemishes or flaws in your prototype.
If you're used to the healing brush in Lightroom, this works similarly. In my opinion, the Photoshop version does a improve job though.
How to practice it
On the tools panel, choose the tool that looks similar a bandage with a dotted line over the top of it. Conform the size of the brush for the job at hand and but paint over your flaw. PS will make the adjustment for you.
Within the spot healing brush are a few options. If yous look at the top of the screen, y'all'll detect three options: Content-Aware, Create Texture and Proximity Friction match. Each option changes how PS samples to brand the correction. I like proximity match for fixing blemishes or small flaws and content-aware for larger fixes. Create texture isn't something I use a lot. But play around with all 3 to see which works best for you lot given what you are trying to practise.
If you lot don't like how it looks, yous tin always undo information technology!
Healing brush
The healing castor samples pixels from some other part of your epitome to use over the area you'll fix. The healing castor too matches the texture, lighting, opacity and transparency of the sampled pixels. It'due south different than the spot healing brush because you lot tell Photoshop where to sample for the information.
I usually start with the spot healing brush. If information technology doesn't requite me the results I like, then I employ the regular healing brush.
How to practise information technology
Click and concord on the spot healing brush icon. This bring upwardly a popup box where you can change the tool to the healing brush. Choose the icon that looks like a bandage. Adjust the size of your castor as needed. Next, choose the area of your image you desire to sample from past holding down the Alt key and clicking on that expanse of your image. Then click on the area y'all desire to heal and apply the sampled expanse.
As you click and hold your cursor to use the healing brush, you lot'll encounter a cross-hair announced on the area you've sampled from. The area you lot sample changes as you move the healing brush around.
#4 – The Clone Stamp Tool
Next on our list of the first things to learn in Photoshop is the clone tool. You'll come across this tool referenced all the fourth dimension in photography groups and tutorials. The clone tool works a lot like the healing castor. You select sample a point in your image, PS uses that point to apply changes to the surface area you lot want to set. But unlike the healing brush, the clone tool paints a complete copy of the area you've selected. The healing brush, on the other paw, keeps the highlights and shadows of what you're painting and only applies the colour.
The clone stamp is the tool you want when yous are working with divers edges. You lot're essentially duplicating that function of your paradigm on another function of your paradigm.
You tin can even sample points on a different image, as you'll encounter in the video below!
How to do information technology
Choose the clone stamp from the tool bar. It looks like an sometime-fashioned rubber stamp with a handle.
Click on the area yous want to clone by holding down the Alt Key (PC) or Apple tree key (Mac) and clicking on the area. Adapt the size of the clone postage brush if needed.
Paint the cloned area over the surface area you want to change by clicking and holding downwards the cursor. Similar the healing brush, you'll be able to come across the indicate you are cloning considering it's marked with a cantankerous-hair.
Stop painting and sample a different indicate as needed.
#5 – Patch Tool
The patch tool replaces an area by copying and applying the texture of a selected surface area in your image. Unlike the healing brush or clone postage where you sample the area first, with the patch tool yous define the area yous want to change first. And so you tell Photoshop what expanse you desire to sample by dragging the selected area to different parts of your epitome.
I use the patch tool when I need to remove a bit of sky or dead grass or pile of moo-cow poop (it'southward a bigger deal than yous'd retrieve when you're a lensman in rural Wyoming.) It's also my go to tool for eliminating tree branches, powerlines or removing people from the background of my scene.
How to do it
Select the patch tool by clicking on the healing brush or spot healing brush icon. The patch tool is house with both of those. Information technology's the icon that looks like a patch; it's a square with lines coming off all four edges.
Select the area you want to fix past clicking and drawing effectually information technology. When you allow become of the cursor, you lot'll see a dashed line around the area you selected. Photoshop too calls these dashes "marching ants."
Now you need to tell Photoshop where to draw the sample from. Click within your marching ants area then drag it to the expanse in your photograph yous desire to sample. Photoshop will then read that area and try to blend it into the marching ants area for a seamless look.
The patch tool is really powerful, every bit you'll encounter in the video below. Once you primary the basics of information technology, you'll showtime to find new and meliorate ways to use information technology!
Click hither for our more than in-depth tutorial on the Patch Tool
Bonus Skill #vi – Flattening and Saving Your Epitome
Now that y'all've fixed that acne or deleted the powerline, y'all need to flatten and save your paradigm. This permanently adheres your changes to your image. If you think back to the example I used of PS layers working like a agglomeration of glass panels stacked together, flattening your image is like smushing all those panels of drinking glass into one unmarried panel that incorporates ALL the changes you've fabricated.
When you're done with your edits or touchups and are ready to save your prototype, cull Layer>Flatten Epitome. This mashes all the layers together into a terminal edit. Then choose File>Relieve As to save your file. I relieve edits as a separate file and then that I ever have my unaltered original to go back to should I demand it.
Sometimes you demand all these skills
With each passing year, Photoshop becomes more than powerful. When I first started learning it two decades ago, it didn't have virtually the capabilities it does now. Most of the time, I tin apply a single tool in a unmarried area and Photoshop fixes my trouble.
But some edits are harder than others and require a few of these skills in combination with each other. If you notice you aren't getting the results you need with a single tool, attempt using a few of them together. For example, I'll apply the patch tool to fix a big expanse of my image, then use the clone postage tool to alloy it in meliorate.

Yous tin can't learn if you don't endeavour
Photoshop actually is one of those apps where you lot but take to leap in and learn. Play effectually. Experiment with different techniques. Try different tools to see what each one does and how you like to fix things.
Different tools can accomplish the same job and you'll detect that you have a preferred method of editing. Only it all starts with the conviction to only open up the programme and first playing.
And retrieve, if y'all've created that indistinguishable groundwork layer AND know how to Disengage, you lot aren't dissentious your epitome permanently.
So open up up PS, catch a practice image and offset working on the starting time 5 things to learn in Photoshop to ameliorate your images today! Concentre on learning how to bear upon-upward images first, so move on to more than advanced techniques, required to make composites like the one you meet above by Sarah Richter from Pixabay. Learning a little scrap at a time prevents PS overwhelm and requite you confidence in mastering the program!
Source: https://www.colesclassroom.com/the-first-5-things-to-learn-in-photoshop-to-touch-up-your-images/
Posted by: gwinnonen1947.blogspot.com
0 Response to "How To Touch Up Model In Photoshop"
Post a Comment